Set up Git
Time for you to install Git and get acquainted with GitLab. Tobias guides you through the steps. The video is a few years old, so follow the steps below for what to actually do.
Step 1. Install Git
Section titled “Step 1. Install Git”Download and install the latest version of Git from git-scm.com/downloads. More information is available in Getting started - installing Git.
Step 2. Open a terminal window
Section titled “Step 2. Open a terminal window”Open the terminal window that belongs to your platform.
Search for and open Git Bash, which is installed together with Git. All instructions in this guide assume Bash.

Use Terminal (runs Bash/Zsh and is built into macOS). Open it through Spotlight (Cmd + Space) and search for “terminal”.
Use the built-in terminal window, which is usually preinstalled.
New to Bash? Have a look at Basics of Bash for beginners.
Step 3. Check your Git version
Section titled “Step 3. Check your Git version”git --versionDepending on your Git version, the output should look something like this:
git version 2.55.0Step 4. Show your Git settings
Section titled “Step 4. Show your Git settings”List your current Git settings:
git config --listIf the output shows a list of settings, everything works as expected and you can move on.
Step 5. Add your name
Section titled “Step 5. Add your name”Add the name you want associated with your changes:
git config --global user.name 'Ellen Nu'Read more about this in Setting your username in Git.
Step 6. Verify the name change
Section titled “Step 6. Verify the name change”You should get your name as output when you run:
git config --global user.nameStep 7. Add your email address
Section titled “Step 7. Add your email address”It’s important that you use your student email.
git config --global user.email 'en999zz@student.lnu.se'Read more about this in Setting your email in Git. Already had Git installed, but not configured with your student email? See Multiple Git user configs for help with handling several configurations on the same computer.
Step 8. Verify the email address change
Section titled “Step 8. Verify the email address change”You should get your email address as output when you run:
git config --global user.emailStep 9. Add SSH
Section titled “Step 9. Add SSH”SSH (Secure Shell) is an encrypted network protocol for secure data communication over an unsecured network. When working with Git and GitLab, SSH gives you several advantages:
- Secure communication - data sent between your computer and the GitLab server is encrypted, so code and sensitive information can’t easily be intercepted.
- Password-free authentication - once SSH keys are set up, you don’t need to enter a username and password every time you push or pull.
- Identity verification - SSH keys come in pairs: a private key that stays on your computer and a public key you upload to GitLab. Only whoever holds the private key can authenticate.
- Smoother workflow - no need to enter credentials every time you interact with a repository.
You will likely create more SSH keys later on, one per service (for example, virtual private servers in the university’s cloud). So give the key a service-specific name instead of the Git tools’ default name, so that it isn’t overwritten or mixed up with other keys later.
-
Generate an SSH key pair with a name that says what it’s used for:
ssh-keygen -t ed25519 -C "en999zz@student.lnu.se" -f ~/.ssh/id_ed25519_gitlab_lnu -N ""The command finishes right away with a summary that looks something like this:
Generating public/private ed25519 key pair.Your identification has been saved in ~/.ssh/id_ed25519_gitlab_lnuYour public key has been saved in ~/.ssh/id_ed25519_gitlab_lnu.pubThe key fingerprint is:SHA256:IO1ESdUxg9Q6p6ggEcc10jbJr1TW9GDWhNu01iTcrSs en999zz@student.lnu.seThe key's randomart image is:+--[ED25519 256]--+| ..+ooo*BO=o . ||. o.*++o+oBoo . || o ..=+ =.= . ||. .+..+ = o || . . ...S= . ||. . . . . E . || . . . . || . || |+----[SHA256]-----+This creates a public key (
id_ed25519_gitlab_lnu.pub) and a private key (id_ed25519_gitlab_lnu) in your~/.sshdirectory.Your
~/.sshdirectory now contains roughly the following:Directory.ssh/
- id_ed25519_gitlab_lnu
- id_ed25519_gitlab_lnu.pub
-
Open
id_ed25519_gitlab_lnu.pubin a text editor and copy its entire contents. -
Log in to your GitLab account and go to SSH Keys in your profile settings. Click Add new key, paste the copied public key into the Key field and replace the prefilled value in Title with
id_ed25519_gitlab_lnu, so you can recognize it among several keys later. Leave Usage type and Expiration date as they are and save.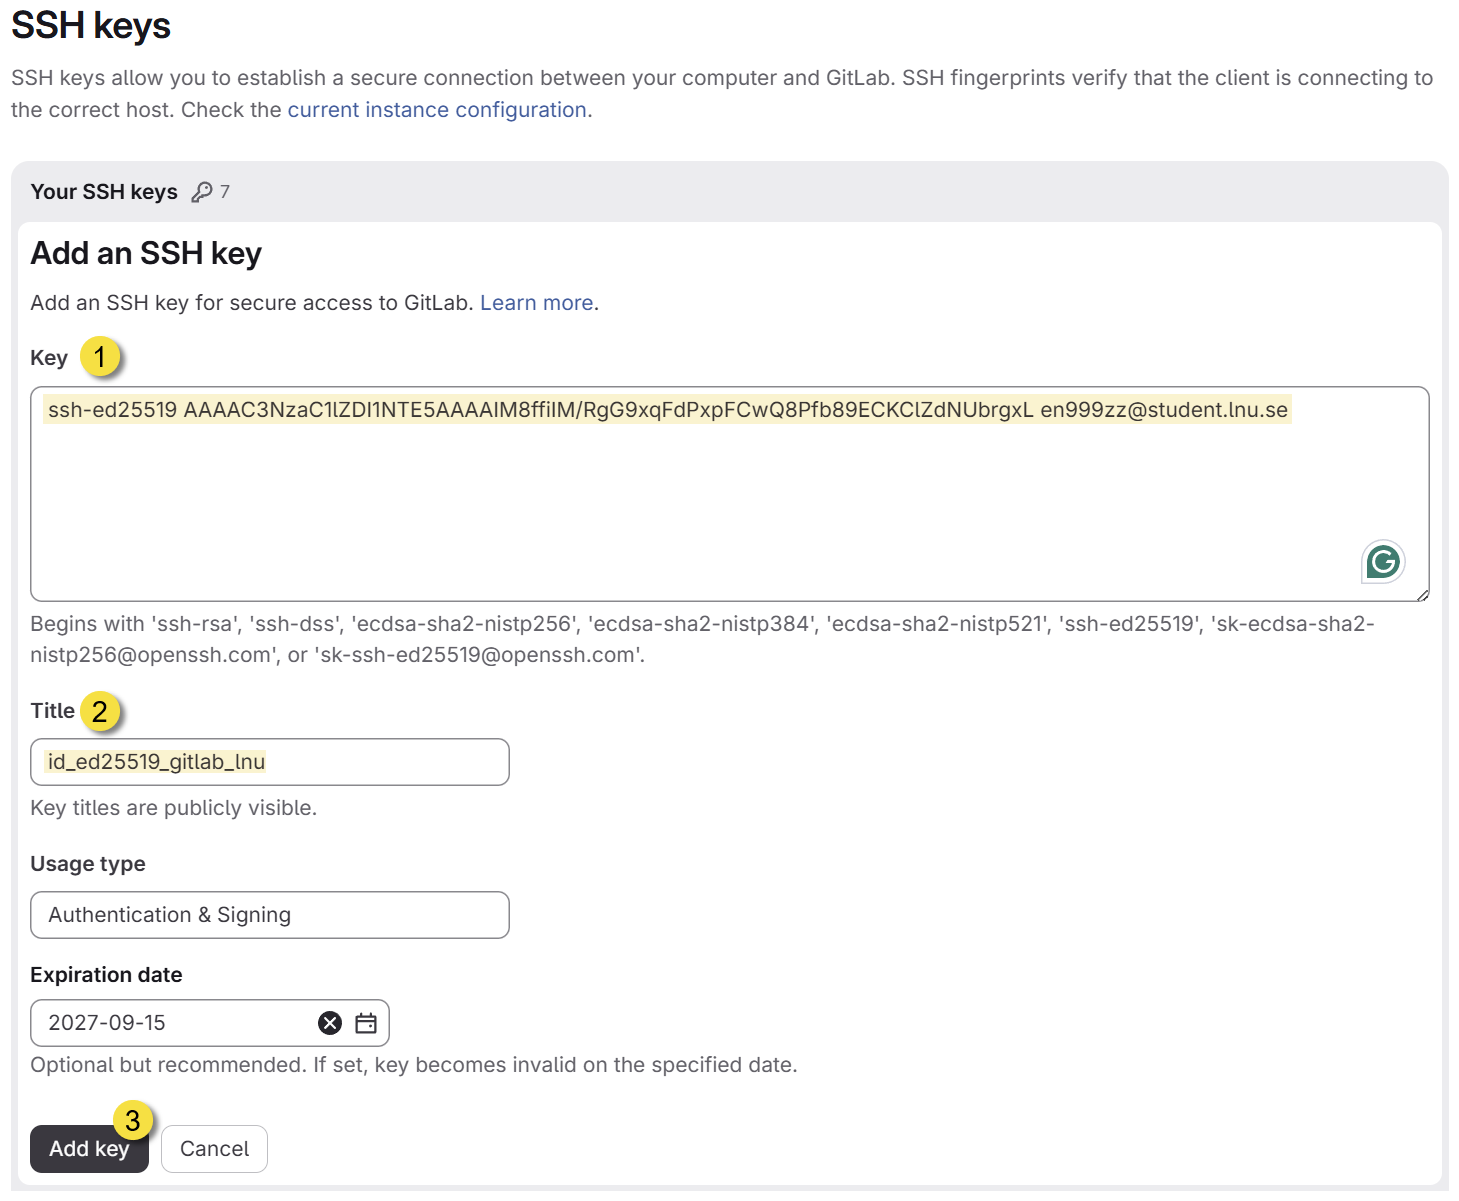
The screenshot is taken in GitLab Enterprise Edition v19.2.4-ee. The interface may look different in later versions. -
Since the key no longer has one of SSH’s default names, you need to point it out explicitly for
gitlab.lnu.se. Add the following to~/.ssh/config(create the file if it doesn’t exist):Host gitlab.lnu.seHostName gitlab.lnu.seUser gitIdentityFile ~/.ssh/id_ed25519_gitlab_lnu -
Test the connection by running
ssh -T git@gitlab.lnu.sein the terminal. If it works, you get a welcome message from GitLab.
Your ~/.ssh directory now contains roughly the following:
Directory.ssh/
- id_ed25519_gitlab_lnu
- id_ed25519_gitlab_lnu.pub
- config
- known_hosts
Running into problems with the SSH keys? See Troubleshooting SSH, or read GitLab’s official documentation.
Step 10. Done!
Section titled “Step 10. Done!”Git and GitLab are now ready to use! If you are new to Git and/or Bash, the following resources may help:
- Videos – a few short videos introducing the basics of Git.
- Pro Git – free book online.
- Learn Git in 15 minutes – an informative video by Colt Steele.
- Reference manual
- Basics of Bash for beginners

